post
Django_Nginx_uWSGI配置
·
2 分钟阅读
·
276 字
目录
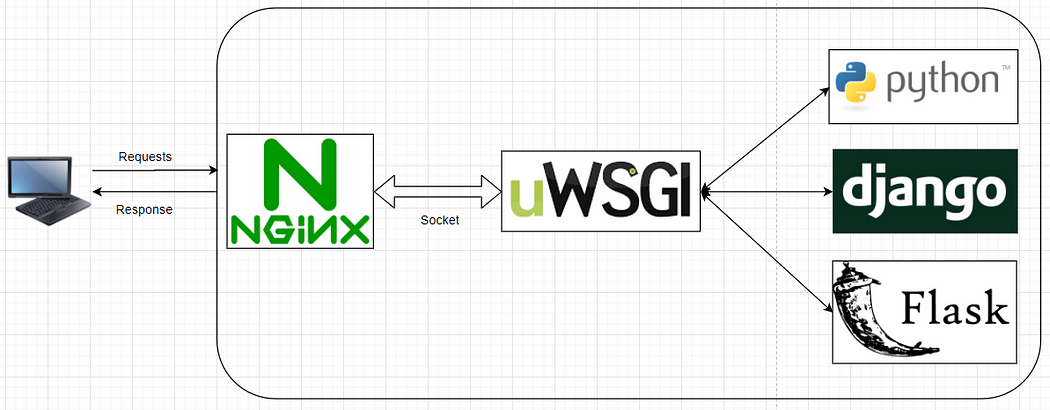
Django是一个开源的Web应用框架,由Python写成
Nginx是一个开源的高性能HTTP服务器和反向代理服务器
uWSGI是一个Web服务器网关接口(Web Server Gateway Interface,简称WSGI)的实现,用于在Web服务器和Python web应用程序之间进行通信
参考:
https://cloud.tencent.com/developer/article/1594840
niginx官方文档:https://nginx.org/en/docs/beginners_guide.html
nginx和uWSGI区别:
- nginx和uWSGI都是web服务器,都可以用来部署django等服务
- **nginx:**处理静态资源能力非常强,还可以提供 负载均衡、反向代理、攻击拦截等
- **uWSGI:**单点部署,容易部署,性能差一些,可以支持的web协议多
uWSGI 和 uwsgi区别:
- **uWSGI:**是一个web服务器
- **uwsgi:**是一种web协议
WSGI和uwsgi区别:
- uwsgi: 也是一种web协议,传输快(二进制存储,其他web协议都是字符串存储)
- WSGI: python专业的web协议
安装Django
pip install Django
ALLOWED_HOSTS = ['*']
安装uwsgi
找不到libpython3.12.a文件
python版本问题
conda create -n django_env python=3.9

conda activate django_env

conda install uwsgi
再次安装Django
安装Nginx
yum install nginx
启动服务
systemctl start nginx
systemctl restart nginx
此时访问服务器ip即可看到nginx页面
设置开机自启动
systemctl enable nginx
停止服务
systemctl stop nginx
配置Django
django-admin startproject demosite
cd demosite
python manage.py runserver 0.0.0.0:8002
外网访问需要修改settings.py:
ALLOWED_HOSTS = ['*']
配置uwsgi
在/etc/目录下新建uwsgi9090.ini,添加如下配置:
[uwsgi]
socket = 0.0.0.0:3031
chdir = /home/wjr/test/django/demosite
wsgi-file = /home/wjr/test/django/demosite/wsgi.py
processes = 5
threads = 30
master = true
daemonize = /home/wjr/test/django/demosite/uwsgi.log
module=demosite.wsgi
pidfile = /home/wjr/test/django/demosite/uwsgi.pid
chmod-socket=666
enable-threads = true
# 使用uwsgi启动django:一定要在这个项目目录中
uwsgi --http x.x.x.x:80 --ini /etc/uwsgi9090.ini --static-map=/static=static
# 访问项目:http://x.x.x.x

# 停止uwsgi
pkill -9 -f uwsgi
# or
uwsgi --stop /home/wjr/test/django/demosite/uwsgi.pid
配置Nginx
在/etc/nginx/conf.d下创建并编辑nginx.conf
server {
    listen       8888;
    server_name  192.168.56.11;
    client_max_body_size 5M;
    gzip on;
    gzip_buffers 32 4K;#压缩在内存中缓冲32块 每块4K
    gzip_comp_level 6 ;#压缩级别 推荐6
    gzip_min_length 4000;#开始压缩的最小长度4bit
        gzip_types text/plain application/json application/javascript application/x-javascript application/css application/xml application/xml+rss text/javascript application/x-httpd-php image/jpeg image/gif image/png image/x-ms-bmp;
        location / {
              include uwsgi_params;
              uwsgi_pass 0.0.0.0:3031;
              uwsgi_ignore_client_abort on;
        }

        error_page 404 /404.html;
            location = /40x.html {
        }

        error_page 500 502 503 504 /50x.html;
            location = /50x.html {
        }
}
[root@linux-node1 demo2]# systemctl restart nginx   # 开启nginx
[root@linux-node1 demo2]# uwsgi --ini /etc/uwsgi9090.ini    # 启动uwsgi的django项目
# http://192.168.56.11:8888/ 访问项目
[root@linux-node1 demo2]# uwsgi --stop uwsgi.pid    # 关闭uwsgi
如果遇到端口冲突,可以检测冲突进程:
lsof -i :80
Flask学习笔记
Flask 是一个用 Python 编写的轻量级 Web 应用框架。它基于 Werkzeug WSGI 工具包和 Jinja2 模板引擎。
安装
pip install flask
创建py文件:
from flask import Flask

app = Flask(__name__)

@app.route("/")
def hello_world():
    return "<p>Hello, World!</p>"
运行:
flask --app hello run --host=0.0.0.0 --port=5739
curl测试:
curl -X POST http://x.x.x.x:5739 -H "Content-Type: application/json" -d '{"text":"️️测试文字"}'